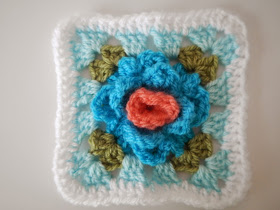
Pages

Friday, May 29, 2015

WEEK 5 - Granny Rose CAL: The Edge/Border

WEEK 5
The Edging/Border

We are very close to the "TADA" finish line.

Are you ready for the final step?

OK here it goes:
Single crochet around the entire afghan, with white,
 to straighten out where the granny squares
 join and give it a clean edge to work with.

At this point you could follow the picot edge from your pattern here,
use any edge/border design that you like,

~OR~

use a variation from the border from this pattern which is
what I decided to do.

(Those are rose petals leftover from a Mother's Day arrangement -
rose petals...rose afghan, it fits, huh?)

Variations from border pattern:

ROW ONE: is a row of sc as mentioned above with three sc in each corner.

ROW TWO: is *1 hdc in each of the next 3 stitches then a hdc decrease.*
Repeat from * to * to end with 3 hdc in each corner.
(This will pull your edges in a little tighter in order to avoid a loose ruffly look.
If you like the ruffly look then simply hdc in each sc from the previous row.)

ROW THREE: is the bobble row from the border pattern.
(You can add a row of dc after row three, like in the pattern;
however, I did not on this afghan.)

ROW FOUR: is the shell row from the border pattern.

ROW FIVE: is the picot fan row from the border pattern.


That's it and you are done!


Next week I will reveal the finished afghan
and I would love to see yours too!

Also see appleblossomdreams on Instagram.
#grannyrosecal

Have a rosy week!

Please send photos of your projects and I would be happy to post them.
Send a link or attach photos to and email and send to
astri.bowlin@gmail.com

Wednesday, May 27, 2015

CAL Homies Update on Pastel Rose Afghan II


Progress from some of my CAL homies
who are Crocheting-a-Long.

 Kate's leaf row:

Sandra's Leaf row:

Sandra's Granny Row:

Great work CAL homies!

If you would like to join us, you can begin crocheting-a-long by clicking here. :-)


Friday, May 22, 2015

WEEK 4 - Granny Rose CAL: Granny Row and Bonus Row and Join

Hey, hey my CAL friends!

Now let's add a granny row to your granny rose squares,
add an optional hdc row and join the squares.

I hope your leaf row went well and that you are ready to push
up your shirt sleeves for a busier week this week.

WEEK 4
The Granny Row,
Optional Bonus Row and Joining Squares

Part of this week is similar to last week;
you'll add a granny square row in the lighter pastel colors of your yarn.
  Just follow step four in your pattern from here.

I used:
Sherbet
Soft Peach
Spring Green
Lemon
Apricot

I tried to make an even amount of each one, but it worked out a little more random than that.
I made more Sherbet and Spring Green.

Every effort was made to ensure that the granny row
 was a different color than the outside of the rose petals.

Also, when I placed them together I tried not to have two roses colors
 and two granny row colors next to each other,
 but occasionally that happened and that's alright!
Once you have finished all the granny rows,
you are ready to join the squares in any way you choose.

Here they are with a sc join:
Or you can join as per the pattern.

I was thinking that I wanted more white to soften the afghan.

So here's an added optional row of white.
(You will; however, need more than one skein of white if you choose this option,
probably three skeins if you include the additional border option for next week.)

It's just a hdc all the way around the granny rose square.

Like this:

Start with 3 chs in the corner.

2 hdc in same corner

a hdc in each st around

  including a hdc in the ch space from the granny row below.

 Continue,

 with 3 hdc in each corner.

Finish off with invisible join, if preferred:

Weave in ends and

there you go.
A finished square with a pretty white hdc edge.


Do this 64 times and you'll get this:

Here's a photo with and without the bonus hdc row:
You choose what you like best.
You could even made the hdc row a different color on each square - that could be fun!

Once you have them placed in an order that you like, you will join them.
This is how they look joined with a single crochet:

The following photos might help with the sc joining:

When you join the second direction simply ch 1 to jump over the first set of joining rows:


Does it look like this?
I hope so!

Happy joined squares that all have each other now!

Join us next week for the final week: 
WEEK 5
The Edging

Have fun with your pretty squares!
(I think this is my most favorite Granny Rose project, so far.)

Also see appleblossomdreams on Instagram.
#grannyrosecal


Tuesday, May 19, 2015

CAL Homies Update on Pastel Rose Afghan I

Goodness, this CAL has been fun.
Here are some updates from a few of the participants who
have helped make it fun!

Sandra from the Reflections and Nature Blog has
finished all her roses and has been onto the leaf row for the last couple of days:
 She stayed with the one tone rose except for a few two tone roses and they are gorgeous!

This is the amazing Cogaroo's Step 1 and 2:
Click on photo to take you to her blog and blog post.
Very pretty!

And here are kind Kate's beautiful pink and variegated pink roses:
She can make a rose in 7 minutes!
An excellent time.
Clicking on the photo will take you to her blog too.

It's never too late to join in.
See this post for the first step and then each Friday after that for each consecutive step.

Thank you lovely ladies!

P.S. If you are participating in the CAL, and you would like to share photos of your project,
 then please email them to astri.bowlin@gmail.com or
send me a link and I will post them on the next "Homies" update.

Also see appleblossomdreams on Instagram.
#grannyrosecal


Friday, May 15, 2015

WEEK 3 - Granny Rose CAL: Leaf Row

Hi there!

So how did the roses go?
Did you finish all 64?
If not, keep up the good work, if so, it's time for:

WEEK 3
The Leaf Row
 This weeks "assignment" is easy.
Take all your roses and follow Step 3 on your pattern from here
and crochet the leaf row in Meadow or the color of your choosing.

Here's a little variation that you may like on the leaf row:

Start with ch 4 in the ch space of any outside petal:
(this will count as a dc and ch space for the corner)
 then 4 dc in same space.
The photo shows 3 but 4 works better since
 2 of the chains will count as your  corner.
(This will be part of your first corner,
and you will finish this corner at the end.)

I also changed the sides a bit from the pattern as follows:
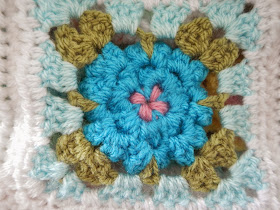
After the corner, ch 2 and sc in the middle of the bottom of the petal instead of 3 dc,
 then ch two to the next corner.

Perhaps the following photos will help:
This is the finished square from the back:
And here is a close-up from the front.


Here's the finish of the leaf row:
2 dc back into that same beginning corner to complete that corner,

then an invisible join:

Weave in ends:
See how the 3 chs at the beginning made for only one ch for the middle of this corner,
 that's why 4 chs at the beginning would have worked better so there woudl be 2 chs for the corner.
Once again, I live and learn; a student of myself and my blog friends. haha ;-)

Complete the leaf row on all 64 squares and then next
Friday May 22nd you'll be ready for the granny row
along with and extra row option of a delightful surprise that
varies from the pattern. ;-)

Let me know if you have any questions;
otherwise I will see you next week
for the 
GRANNY ROW!

P.S. Please let me know if you have any photos of your project
 you would like to share and I will post them.
Please email them to astri.bowlin@gmail.com.
Also see appleblossomdreams on Instagram.
#grannyrosecal